


Showing posts with label Tutorial Windows. Show all posts
2 Easy Ways to Hack Windows 7 Password
Method 1. Use Windows 7 Password Hack Tool to Hack Windows 7 Password without Logging in
Windows Password Key is the one of the most recommendable Windows 7 password hack program on the market. It 100% guarantees that you can hack any Windows login password in Windows 7: both standard and administrator. It can create a password hack USB even after you forgot the password. In a word -- non-restrictive and powerful enough. By the way, it supports Windows 7 and older Windows operating systems.Here we take how to hack Windows 7 administrator password for example.
- 1. Download
Windows Password Key, install and launch it on another available PC.
Inset a USB flash drive into it. Click "Burn" to make a computer
password hacking USB.
- 2. Insert the newly created USB drive to the locked
Windows 7 computer. Set USB drive as the first boot device in BIOS
setup. This computer will reboot.
- 3. Windows Password Key loads, follow the interface to hack Windows 7 password.


Method 2. How to Hack Other User Password in Windows 7 with Command Prompt?
Only administrators can change any user password at a Windows command prompt. If you don't have the administrator privilege, try Windows Password Key to hack Windows 7 login password straightforwardly.- 1: Press "Win Key"+"R" and type "cmd" in the "Run" command box and hit enter to open command prompt. And then type "net user" in the command prompt and hit "Enter". The Command Prompt will show you all accounts on the Windows 7 PC.
- 2: Type "net user mosoh 123456" (mosoh is the locked
admin account's name and 123456 is the new password) and press "Enter".
Now you have successfully created a new password on the locked admin
account.
- 3: Type "shutdown -r -t 00" and press "Enter".

Now that you've regained access to Windows 7, go back and follow advice below.
- To avoid administrator password hacked by someone malicious, set all the user accounts to Standard except for one Administrator account that only you can access.
- Create a password reset disk, just in case. That way you won't get burned again.
- If you lost your password but didn't create a password reset disk, just use Windows Password Key. It's worth having.
How to Hack Windows 7 (Become Admin)
Step 1: Introduction:
Hello! HackersIn this tutorial I will tell you how to hack windows 7 administrator password. However you already know (I think)
Specifically, it is used in school, computer labs or other workplaces,
where, administrator is locked with a password, while you can only use standard user or guest.
Step 2: Start That PC:
- Turn on the UPS and the CPU, tap F8 continuously on the boot screen to get some windows start-up options .
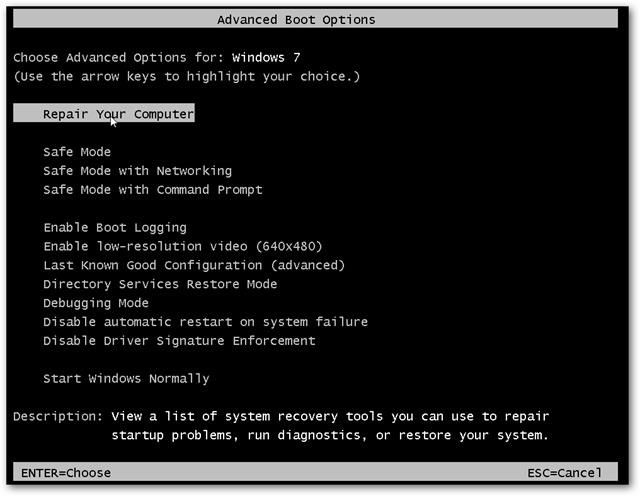
- Choose "Start windows normally" option and turn the UPS off immediately.
- Then turn on the PC again, let it load.
- After that you will be prompted with two options in the boot screen (again), select the first option - "Launch Start-up Repair(recommended)"

- Let it load and Scan for issues.

- After 5 min, It will ask you to "restore defaults", select "Cancel" option.

- Let it continue...

Step 3: Wait for About 15-20 Minutes:
Now this is where the tricky part comes:- After 20 min, an error report screen will pop-up, asking to send information or not.

- Ignore it, click on "View Problem Details" arrow, scroll down to the end of the report, then click a link stating X:\windows\ something...something (the link starts with an"X")

- Another Window will pop-up, and will look like a notepad (it is a notepad)
- Click File on the Menu-Bar, then select Open, and another window will pop-up (that's just too many windows!)
- Navigate to C: drive (or whatever drive on which windows is installed), click Windows, then System32, after that click on the arrow beside the "File Type" option and select "all files"

- Then search for a file named "sethc"(this is the shortcut to stickey keys), rename it to something else (Eg:abc)
- Search for cmd, make its copy and rename the copy as "sethc"
(Almost)
- Close everything, restart the PC, go to the log-in screen, press shift 5 times, until a cmd (command prompt) pops-up.
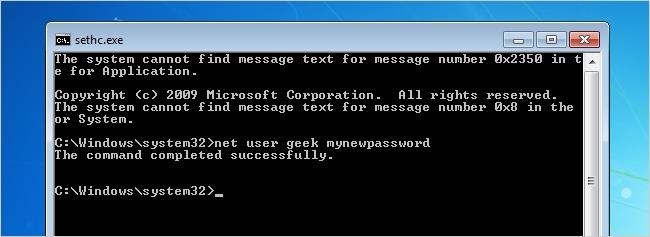
- Type in "net user administrator /active:yes", and this will activate the default administrator account of the PC.
- Change/delete/manage/reset passwords from there.
- Or you can directly change passwords from cmd, type "net user (admin/any admin account's name) and then after a space put an asterix.
Step 4: The End:
I know that many of you may know this vulnerability in Windows 7, I just wanted that a tutorial like this should be in Null Byte.Unfortunately, this vulnerability been overcame in Windows 8 :(
Thank You,
Source Of : http://null-byte.wonderhowto.com
How To Enable GodMode In Windows and Its Complete Features
How To Enable GodMode In Windows and Its Complete Features
 What is GodMode?
Windows GodMode is an old trick, but I thought it’d be nice to share it with our readers who don’t know about it as Windows 10 is released. Also, I’ll be telling about all GodMode folders here, not just a single one. Windows GodMode, as the name suggests, provides you a shortcut and grander access to various control panel settings. It is also known as the Windows Master Control Panel shortcut (All Tasks) or All Tasks folder by different people.
By making this GodMode folder, you’ll get access to all the settings of the control panel in your OS within a single folder. This hack was first revealed in 2007 and it works in operating systems higher than Windows Vista i.e Window 7, Window 8, Windows 8.1, and Windows 10. As you’ll know how to do it, you’ll come across the step of renaming the folder and using the phrase “GodMode”. Actually, GodMode name has nothing to do with this trick. Use your name instead of GodMode and it’ll work just fine because GodMode is just a name given to this trick as it got popular.
1. Create a new folder in Windows

2. Rename it to: GodMode.{ED7BA470-8E54-465E-825C-99712043E01C}

3. Once renamed it’ll converted and looks like control panel icon, open and there you have it


Note: You can enable GodMode using this trick in Windows Vista Window 7, Window 8, Windows 8.1,and Windows 10.
How to enable all GodMode folders?
There’s a lot more to this GodMode trick. There are a lot more GodMode folders waiting for you to utilize them. Copy and paste the script written below in a new notepad file. Rename this file as “godmodes.bat” and paste at the location where you want these GodMode folders to be. Now click on the renamed file “godmodes.bat” and there you have a list of GodMode folders, all with different uses.
1. mkdir "Special Folders
2. cd ".\Special Folders
3. mkdir "God Mode.{ED7BA470-8E54-465E-825C-99712043E01C}
4. mkdir "Location Settings.{00C6D95F-329C-409a-81D7-C46C66EA7F33}
5. mkdir "Biometric Settings.{0142e4d0-fb7a-11dc-ba4a-000ffe7ab428}
6. mkdir "Power Settings.{025A5937-A6BE-4686-A844-36FE4BEC8B6D}
7. mkdir "Icons And Notifications.{05d7b0f4-2121-4eff-bf6b-ed3f69b894d9}
8. mkdir "Credentials and Logins.{1206F5F1-0569-412C-8FEC-3204630DFB70}
9. mkdir "Programs and Features.{15eae92e-f17a-4431-9f28-805e482dafd4}
10. mkdir "Default Programs.{17cd9488-1228-4b2f-88ce-4298e93e0966}
11. mkdir "All NET Frameworks and COM Libraries.{1D2680C9-0E2A-469d-B787-065558BC7D43}
12. mkdir "All Networks For Current Connection.{1FA9085F-25A2-489B-85D4-86326EEDCD87}
13. mkdir "Network.{208D2C60-3AEA-1069-A2D7-08002B30309D}
14. mkdir "My Computer.{20D04FE0-3AEA-1069-A2D8-08002B30309D}
15. mkdir "Printers.{2227A280-3AEA-1069-A2DE-08002B30309D}
16. mkdir "Application Connections.{241D7C96-F8BF-4F85-B01F-E2B043341A4B}
17. mkdir "Firewall and Security.{4026492F-2F69-46B8-B9BF-5654FC07E423}
18.mkdir "Performance.{78F3955E-3B90-4184-BD14-5397C15F1EFC}

List of all GodMode folders
Source Of : Fossbytes.com/
cara menonton film "STAR WARS" di "CMD" Windows XP
Windows XP ga bisa dianggap remeh ka
dulu saya pernah merasakan banyak keuntungan dari penggunaan xp
dari KAHTdll :p
itu juga diwarnet -_-
oke langsung aja
saya mendapatkan Sumber dari : 1CAK
1. Bukan Run atau tekan Windows + R pada keyboard
2. Ketik "CMD" tanpa tanda petik
3. Nanti akan keluar layar hitam (DOS)
4. Ketik Telnet dan tekan Enter
5. Kemudian ketik "o" tanpa tanda petik lalu Enter
6. Tahap terakhir, ketik towel.blinkenli
7. Tunggu beberapa saat hingga film Star Wars nya mulai
Perhatian:
Pada Windows XP, Telnet telah diaktifkan otomatis oleh Windows.
tapi pada Windows 7/8/8.1 Telnet belum diaktifkan, berikut cara
mengaktifkan Telnet pada Windows 7/8/8.1:
1. Masuk ke Control Panel > Programs > Programs and Features >
Turn Windows Features on or off (kemudian beri centang pada bagian
Telnet Client dan tekan OK)
2. Setelah Telnet aktif, lakukan Langkah ke-3 untuk menonton film
Star Wars pada Command Prompt.
Manfaat:
1. Menonton film Star Wars tanpa menyedot banyak kuota
2. Menemani malam malam minggu anda (buat jomblo :v)
Note: Harus terkoneksi Internet
Sumber: 1CAK
Cara Merubah Tmpilan LOGGED ON Windows 7 Menjadi Seperti MAC OSX

Nah, kali Ini Ane Posting lagi Tentang tutorial………..
Yang Ane Posting ini Adalah, Bagaimana Cara Merubah Tampilan Logged On Windows 7 Menjadi Seperti Mac OSX……
Pasti Anda Bosan Dengan Tampilan Logged On Windows 7 Yang Seperti Biasa Kan……
Walaupun Sudah Kamu Beri Background Baru.. Tetep Aja Tampilannya Gitu-Gitu Aja……..
Oke, langsung Aja Ke tutorialnya….
1. Anda Harus Download File DLL nya Disini…. ato Cari Yang Lainnya Disini
2. Anda Harus Download Software Untuk Mengganti Background Logged On Disini…
3. Setelah Kamu Download Semua, Kemudian Masuk ke C:/Windows/System32 Cari File authui.dll
4. Lalu kamu Ambil Kepemilikan File Itu,….
5. Jika Sudah Kamu Ambil Kepemilikan File Itu, Kamu Ganti Nama File authui.dll Menjadi authui-bak.dll
6. Kemudian Kamu COPY File authui.DLL Yang Kamu Download Tadi, Dan Jangan Lupa Sesuaikan Dengan OS Kamu, Jika 32Bit Pilih Yang x86 dan Jika 64Bit Pilih Yang x64.. Kemudian Kamu Pastekan Ke C:/Windows/System32
7. Kemudian Kamu Jalankan Software Untuk Mengganti Background Logged On/ TweaksLogon…
8. Lalu kamu Klik Yang Ane Beri Panah Dan Pilih Gambar Yang Kamu Download Tadi.. 1PACK dengan File Dll Yang Kamu Download…

Kemudian Klik Test…..
9. Selesai…., jangan Lupa Restart Komputer Anda…..
Terimakasih telah Membaca Artikel Ini…………
Download Windows 8 Font Changer
Nah, kali ini saya upload tentang software......
yang ane upload ini adalah software untuk mengganti Font pada windows 8....
pasti beberapa dari anda ingin memiliki software ini, karena bosan dengan tampilan Font Windows 8 yang begitu-begitu aja.......
Software ini dapat merubah keseluruhan Font di Windows 8.....
tinggal anda pilih saja, apa yang ingin anda ganti Font nya......
Oke, langsung saja kita ke menu Download nya.......
Windows 8 Font Changer (Download)
Jika ada Link yang rusak, Silahkan Comment.......
Terimakasih Atas kunjungannya....... :)
Subscribe to:
Posts (Atom)